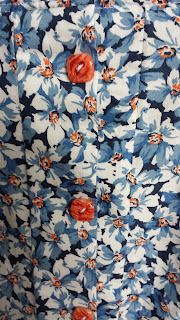
There are rules in dressmaking and, whilst some of those rules can be broken, most them (to my mind at least) are rules for good reason. Let's take my latest dressmaking adventure as an example and highlight just a few of them.
Rule 1: Buy the right amount of fabric
If you see a gorgeous bolt of fabric that you have to have, but you're not sure exactly what you will make with it (and by exactly I mean which pattern you will use, not just some vague notion of a lovely dress for summer) then you must be sure to buy enough fabric. I know that for me a dress length can be anything up to 3 metres. I am generously proportioned and when you combine that with a circle skirt or other fabric munching style, anything less than 3 metres will limit which patterns I can use. So standing in John Lewis, murmuring to yourself that 2 metres is fine because you didn't really have fabric in your shopping budget today is a mistake. Buy enough or buy none.
I did at least buy a forgiving print, which was very handy when I broke rule 2....
Rule 2: When you trace out your pattern, if you are making any alterations - such as adding a button front to the skirt piece - be sure to include that on your new pattern piece. See those extra seams and the buttons squished as far over as possible? That's the result of cutting it out wrong.
Random notes written on the pattern piece reminding you to add 2" at centre front" will not be noticed when you are cutting out with your youngest child sitting under the table talking to you, your son complaining that the table is in the way of the TV and arguing with his teenage sister. You will not see the note. You will cut out your skirt fronts without the extra bit for buttons and buttonholes. You will then be forced to try and put together enough fabric from your scant remains (see rule 1 above) to stitch bits on. Thank goodness for that forgiving print,
Rule 3: Try it on as you go, before adding zigzagging to raw seam edges or topstitching.
Even if you've used the pattern before and especially if you haven't or you've changed something (like adding a different skirt to the tried and tested bodice), trying it on before you go beyond the point of unpicking and fixing fitting problems is absolutely vital. Otherwise, your slight sway back which mysteriously didn't manifest itself in previous versions of this exact same bodice will pounce. Too bad the dress was completely finished when I realised.
My sewing machine through a wobbler and the buttonhole lever refused to work. I threw the dress on the floor, packed the machine away and picked up some knitting instead. My husband medicated me (large glass of red) and withdrew to a safe distance. A few slurps later, I realised that I could stitch the buttons in place through both centre fronts and stick a zip in the back. If I had only remembered that my daughter also has a sewing machine. Oh well, too late now. Because I almost always wear a cardigan over a dress, because a concealed zip takes seam allowance and because I had a regular white zip, I went for an exposed zip. Not pretty inside and boy, does it highlight that sway back, but oh well. You can't tell if I pull the dress slightly below my natural (quite high) waist and pop a cardigan on.
Despite all of the problems, I am actually very pleased with the result. I wore it the day after I finished it to go shopping with the teenager and felt comfortable and well dressed all day. I particularly like the belt loops keeping the belt securely in place and the lovely pockets. I do like a pocket.
The patterns I used were the Colette Seamwork Adelaide bodice and the Sewaholic Hollyburn skirt. The Adelaide dress originally does not have separate pieces for the bodice and skirt, but having made a couple of dresses already from it, I thought I had the fit for the bodice nailed and I wanted a different skirt. I've had the Hollyburn pattern for a while but not used it. It worked brilliantly. I topstitched the waistband on after I'd put the dress together, tucking the belt loops in and catching them in place at the same time.
I have plans to make more of these with some lovely Liberty fabric I got for my birthday and a couple of other pieces of fabric I have. I love the fitted bodice and flared skirt, and the pockets, waistband and belt loops make it extra special. I might go with a concealed zip in the back and fake the button front. And I will try to follow the rules next time!
PS I also made the cardigan and I cannot tell you how much joy and satisfaction I got from having a complete me-made outfit. I used the Acorn Trail pattern by Amy Herzog as the starting point, but altered it from set in sleeves to raglan (I find they are easier to sew in and feel more comfortable) and I also added extra cables at the front edges to mirror the back. The yarn was from Sirdar, just a basic aran acrylic (for reasons of price and I can't wear wool).


No comments:
Post a Comment